解决CAS机制中ABA问题的AtomicStampedReference详解
AtomicStampedReference是一个带有时间戳的对象引用,能很好的解决CAS机制中的ABA问题,这篇文章将通过案例对其介绍分析。
一、ABA问题
ABA问题是CAS机制中出现的一个问题,他的描述是这样的。我们直接画一张图来演示,
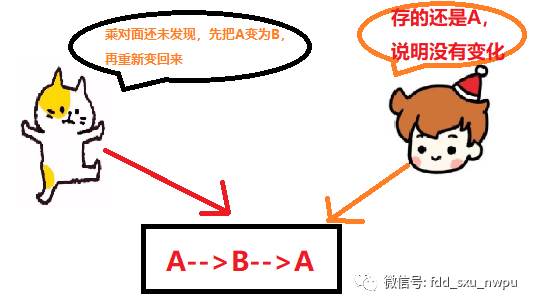
什么意思呢?就是说一个线程把数据A变为了B,然后又重新变成了A。此时另外一个线程读取的时候,发现A没有变化,就误以为是原来的那个A。这就是有名的ABA问题。ABA问题会带来什么后果呢?我们举个例子。
一个小偷,把别人家的钱偷了之后又还了回来,还是原来的钱吗,你老婆出轨之后又回来,还是原来的老婆嘛?ABA问题也一样,如果不好好解决就会带来大量的问题。最常见的就是资金问题,也就是别人如果挪用了你的钱,在你发现之前又还了回来。但是别人却已经触犯了法律。
如何去解决这个ABA问题呢,就是使用今天所说的AtomicStampedReference。
二、AtomicStampedReference
1、问题解决
我们先给出一个ABA的例子,对ABA问题进行场景重现。
public class AtomicTest {
    private static AtomicInteger index = new AtomicInteger(10);
    public static void main(String[] args) {
        new Thread(() -> {
            index.compareAndSet(10, 11);
            index.compareAndSet(11, 10);
            System.out.println(Thread.currentThread().getName()+
                    ":10->11->10");
        },"张三").start();

        new Thread(() -> {
            try {
                TimeUnit.SECONDS.sleep(2);
                boolean isSuccess = index.compareAndSet(10, 12);
                System.out.println(Thread.currentThread().getName()+
                        ":index是预期的10嘛,"+isSuccess
                        +"   设置的新值是:"+index.get());
            } catch (InterruptedException e) {
                e.printStackTrace();
            }
        },"李四").start();
    }
}
在上面的代码中,我们使用张三线程,对index10->11->10的变化,然后李四线程读取index观察是否有变化,并设置新值。运行一下看看结果:
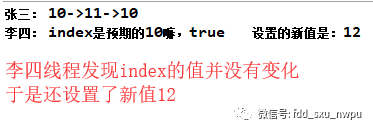
这个案例重现了ABA的问题场景,下面我们看如何使用AtomicStampedReference解决这个问题的。
public class AtomicTest2 {
    private static AtomicInteger index = new AtomicInteger(10);
    static AtomicStampedReference<Integer> stampRef
                            = new AtomicStampedReference(10, 1);
    public static void main(String[] args) {
        new Thread(() -> {
            int stamp = stampRef.getStamp();
            System.out.println(Thread.currentThread().getName()
                    + " 第1次版本号: " + stamp);
            stampRef.compareAndSet(10, 11,stampRef.getStamp(),stampRef.getStamp()+1);
            System.out.println(Thread.currentThread().getName()
                    + " 第2次版本号: " + stampRef.getStamp());
            stampRef.compareAndSet(11, 10,stampRef.getStamp(),stampRef.getStamp()+1);
            System.out.println(Thread.currentThread().getName()
                    + " 第3次版本号: " + stampRef.getStamp());
        },"张三").start();

        new Thread(() -> {
            try {
                int stamp = stampRef.getStamp();
                System.out.println(Thread.currentThread().getName()
                        + " 第1次版本号: " + stamp);
                TimeUnit.SECONDS.sleep(2);
                boolean isSuccess =stampRef.compareAndSet(10, 12,
                        stampRef.getStamp(),stampRef.getStamp()+1);
                System.out.println(Thread.currentThread().getName()
                        + " 修改是否成功: "+ isSuccess+" 当前版本 :" + stampRef.getStamp());
                System.out.println(Thread.currentThread().getName()
                        + " 当前实际值: " + stampRef.getReference());
            } catch (InterruptedException e) {
                e.printStackTrace();
            }
        },"李四").start();
    }
}
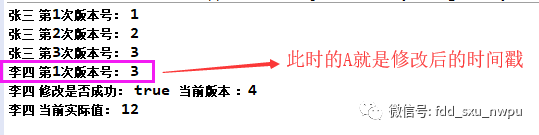
上面的代码我们再来分析一下,我们会发现AtomicStampedReference里面增加了一个时间戳,也就是说每一次修改只需要设置不同的版本好即可。我们先运行一边看看:
这使用的是AtomicStampedReference的compareAndSet函数,这里有四个参数:
compareAndSet(V expectedReference, V newReference, int expectedStamp, int newStamp)。
(1)第一个参数expectedReference:表示预期值。
(2)第二个参数newReference:表示要更新的值。
(3)第三个参数expectedStamp:表示预期的时间戳。
(4)第四个参数newStamp:表示要更新的时间戳。
这个compareAndSet方法到底是如何实现的,我们深入到源码中看看。
2、源码分析
    public boolean compareAndSet(V   expectedReference,
                                 V   newReference,
                                 int expectedStamp,
                                 int newStamp) {
        Pair<V> current = pair;
        return
            expectedReference == current.reference &&
            expectedStamp == current.stamp &&
            ((newReference == current.reference &&
              newStamp == current.stamp) ||
             casPair(current, Pair.of(newReference, newStamp)));
    }
刚刚这四个参数的意思已经说了,我们主要关注的就是实现,首先我们看到的就是这个Pair,因此想要弄清楚,我们再看看这个Pair是什么,
   private static class Pair<T> {
        final T reference;
        final int stamp;
        private Pair(T reference, int stamp) {
            this.reference = reference;
            this.stamp = stamp;
        }
        static <T> Pair<T> of(T reference, int stamp) {
            return new Pair<T>(reference, stamp);
        }
    }
在这里我们会发现Pair里面只是包存了值reference和时间戳stamp。
在compareAndSet方法中最后还调用了casPair方法,从名字就可以看到,主要是使用CAS机制更新新的值reference和时间戳stamp。我们可以进入这个方法中看看。
    //底层调用的是UNSAFE的compareAndSwapObject方法

    private boolean casPair(Pair<V> cmp, Pair<V> val) {
        return UNSAFE.compareAndSwapObject(this, pairOffset, cmp, val);
    }
三、总结
其实除了AtomicStampedReference类,还有一个原子类也可以解决,就是AtomicMarkableReference,它不是维护一个版本号,而是维护一个boolean类型的标记,用法没有AtomicStampedReference灵活。因此也只是在特定的场景下使用。
更多相关文章
- 成为 Java GC 专家( 4 ): Apache 的 MaxClients 参数详解
- Jquery Validate 相关参数及常用的自定义验证规则
- 将参数传递给jQuery的select2 ajax调用
- Bootstrap Multiselect插件使用步骤以及常见参数配置介绍
- 通过调用返回参数的本地函数来构建Ajax Data部分
- WebService Restful方式 Post请求Java无法获取到前台请求的参数,
- html中页面传递参数不用cookie不用缓存,js方法搞定
- 问一个高深的问题,静态html页面如何接收来自服务器的参数?
- 小强的HTML5移动开发之路(53)——jQueryMobile页面间参数传递