【Vue框架学习】组件注册、组件通信、前端路由实现原理等知识点学习归纳笔记
Vue组件
组件(component):是Vue最轻大的功能之一。 组件化开发特点:组件可以扩展HTML元素,封装可重用代码。
vue组件可以理解为预先定义好的ViewModel类。一个组件可以预定义很多选项,最核心的有:
模板template:模板反映了数据和最终展现给用户的DOM之间的映射关系,模板的要求:组件的模板只能有一个根元素
初始数据data:一个组件的初始数据状态,对于可重复的组件来说,通常是私有的状态。组件中的data必须是一个函数且有返回值,因为函数具有独立作用域,组件重用时才不会相互影响内部数据。
接收的外部的参数(props):组件之间通过参数来进行数据的传递和共享,参数默认是单项绑定,但也可以显示声明为双向绑定。
方法(methods):对数据的改动操作一般都在组件内进行。可以通过v-on指令将用户输入事件和组件方法进行绑定。
生命周期函数(钩子函数):一个组件会触发多个生命周期函数,在这些钩子函数中可以封装一些自定义逻辑。可以理解为controller的逻辑被分散到了这些钩子函数中。
注册组件就是利用Vue.component()方法,先传入一个自定义组件的名字,然后传入这个组件的配置。
(组件名不要带有大写字母,多个单词使用中划线分隔my-dom)
组件分为全局和局部组件,全局组件可以在多个Vue实例中重复使用,局部组件是在当前vue实例中注册的,只能在当前实例中使用。
创建组件
基本步骤:
1、创建组件构造器(调用Vue.extend()方法创建组件构造器)
2、注册组件(调用Vue.component()方法注册组件)
3、使用组件(在实例的作用范围内使用组件)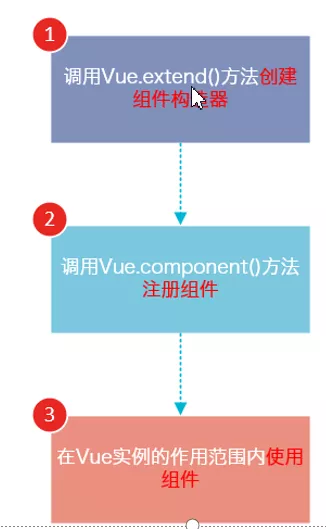
- 全局组件创建
第一种方式
<div id="app"><child-component></child-component></div><script>// 1.创建组件const childComponent = Vue.extend({template: '<p>这是组件的全局注册</p>',data(){return {msg: "hello Word!",}}});// 2.注册组件Vue.component("child-component", childComponent);// 3.挂在Vue实例中const vm = new Vue({el: "#app",data: {msg: "hello",}});
第二种方式
<div id="app"><child-component></child-component></div><script>// 注册同时创建Vue.component("childComponent", {template: `<div><p>这是组件的全局注册--{{message}}</p></div>`,data() {return {message: 'hello world'}},methods: {}});// 实例化Vueconst vm = new Vue({el: "#app",data: {}});</script>
组件可以嵌套
<div id="app"><my-itany></my-itany></div><script>Vue.component('my-itany',{template:`<div><p>第一行</p><you-itany v-bind:message="mas"></you-itany></div>`,data:function(){return{mas:'asfg'}}})Vue.component('you-itany',{props:['message'],template:`<div><p>{{message}}</p></div>`})new Vue({el:'#app'})</script>
- 局部组件创建
第一种方式
<div id="app"><hello-world :msg="msg"></hello-world></div><script>const vm = new Vue({el: "#app",data: {msg: "hello",},methods: {},components:{helloWorld:{template:`<p>这是组件的局部注册--{{msg}}--{{message}}</p>`,data(){return {message: "hello world!"}},props:["msg"]}}});</script>
第二种方式
<div id="app"><hello-world></hello-world></div><script>const helloWorld = {template: `<p>这是组件的局部注册--{{msg}}</p>`,data(){return {msg: ""hello world"}}};const vm = new Vue({el: "#app",data: {msg: "hello",},methods: {},components:{// helloWorld: helloWorld,// 当属性值变量与属性名相同时,且在同一个作用域中则可以省去值变量名称helloWorld,}});</script>
第三种方式
<div id="app"><hello-world></hello-world></div><template id="hello"><p>这是组件的局部注册--{{msg}}</p></template><script>const helloWorld = {template: "#hello",data(){return {msg: "hello world!"}}};const vm = new Vue({el: "#app",data: {msg: "hello",},methods: {},components:{helloWorld,}});</script>
注意:在组件中data选项必须是一个函数且有返回值
多个组件点赞案例实现
<div id="app"><button-inc :name="people[0]"></button-inc><br/><button-inc :name="people[1]"></button-inc><br/><button-inc :name="people[2]"></button-inc><br/><button-inc :name="people[3]"></button-inc><br/></div><script>Vue.component("buttonInc",{props: ["name"],template: `<div><h1 v-text="name"></h1><button @click="count++">点赞:{{count}}</button></div>`,// 注意:这里data需要是函数且有返回值,否则重复渲染多个相同组件时,会影响其他相同组件中的数据。data(){return{count: 0}},});const vm = new Vue({el: "#app",data:{people: ["1号 天蓬老师", "2号 灭绝老师", "3号 欧阳老师", "4号 西门老师"]},methods:{}});</script>
排名不分先后,本点赞数量纯属虚构,如有雷同纯属胡扯……
组件传参
Vue 组件通信的关系主要有:
父子关系 兄弟关系 隔代关系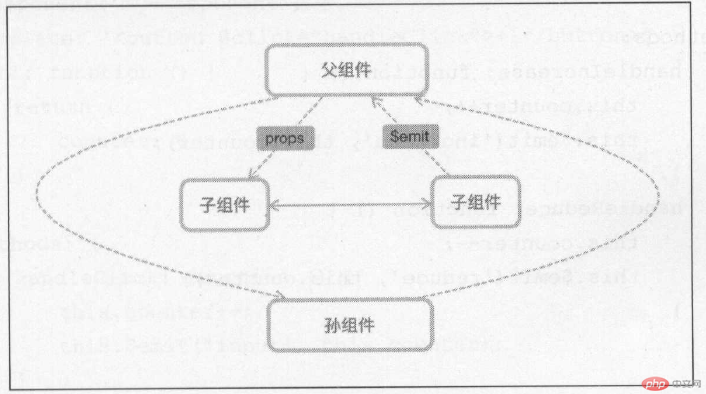
- 父组件往子组件 (属性传参)
组件props是父子组件间的桥梁
props格式为:props:[‘ 自定义属性’],
<div id="app"><my-mother></my-mother></div><script>Vue.component('my-mother',{template:`<div><my-tit v-bind:tit="title"></my-tit><ul><li v-for="(item,index) in arr" :key="index" v-text="item"></li></ul></div>`,data:function(){return{arr:['banana','apple','orange'],title:'水果贩卖'}}})Vue.component('my-tit',{props:['tit'],template:`<h1>{{tit}}</h1>`})new Vue({el:'#app'})</script>
父组件给子组件传递数据(利用props属性)
<div id="app"><parent></parent></div><script>const app=new Vue({el:'#app',components:{//一个父组件里边可以包含多个子组件parent:{template:'<h1 >{{msg}},父组件<children :n="msg"></children></h1>',data:function(){//父组件的数据 传给子组件return {msg:'hello'}},components:{children:{props:['n'],//根据props拿到父组件中写的动态属性拿到数据template:'<h2>{{n}},子组件</h2>',}}}}})
父向子传值总结v-bind:dataOfChild="dataOfParent"(父组件)====>props:['dataOfChild'](子组件)
注意:组件的传参是单向的,我们不能在子组件中直接更新父组件传递过来的参数,虽然表面上看似可以更新成功,但是数据并没有同步到父组件data中,在Vue中是不允许的,需要通过事件呼叫父组件自己修改其中的数据。
- 子组件往父组件 (事件传参)
子传父用事件传($emit)
子组件通过this.$emit(‘自定义事件’,参数)。
子组件中需要以某种方式例如点击事件的方法来触发一个自定义事件
将需要传的值作为$emit的第二个参数,该值将作为实参传给响应自定义事件的方法
在父组件中注册子组件并在子组件标签上绑定对自定义事件
<div id="itany"><my-father></my-father></div><script>Vue.component('my-father',{template:`<div><p>{{message}}</p><my-son @send="handle"></my-son></div>`,data:function(){return{message:''}},methods:{handle(text){this.message=text}}})Vue.component('my-son',{template:`<button @click="send">传递</button>`,data:function(){return{msg:'Who are you? is son'}},methods:{send:function(){this.$emit('send',this.msg)}}})new Vue({el:'#itany'})</>
子组件给父组件传递数据,利用事件的订阅发布模式
<div id="app"><parent></parent></div><template id="parent"><div><p>父组件{{msg}}</p><!-- 点击子组件触发getData获取到子组件转来的msg数据,绑定到父组件上 --><children @s="getData"></children></div></template><script>var app=new Vue({el:'#app',components:{parent:{template:'#parent',data(){return {msg:'aaa'};},methods:{getData(data){alert(data);//子组件传过来的数据this.msg=data;}},components:{children:{template:'<p @click="changeData">子组件</p>',methods:{changeData(){this.$emit('s','lalala,传值给父组件'); //传递给父组件}}}}}}})</script>
子向父传值总结:
this.$emit(‘parentFunction’,’hello world’)(子组件)
====>@:parentFunction=”customParentFunction”(父组件)
====>customParentFunction(data) {}(父组件)
讲个故事加强印象: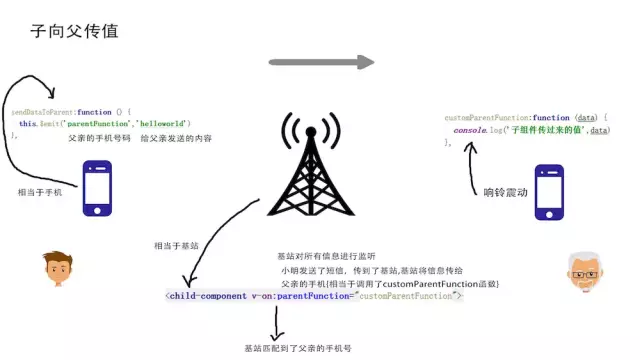
情景一:
话说,在遥远的大山那边,有一对父子,父亲叫老王,儿子叫小明。父亲由于岁数大了,平常就在家干点农活,小明为了养家,外出打工。
有一天,小明想爸爸了,拿起手机给爸爸发短信,子组件主动向父组件传值,小明拿起手机,调用自己的sendDataToParent方法,在通讯录中找到了爸爸的手机号,this.$emit的第一个参数,函数名,然后拿起手机,扣了一堆字:爸爸我想你了,最近怎么样?通过this.$emit的第二个参数内容,然后发送~,短信传到了信号塔,child-component相对应基站,基站对所有短信进行监听,正好,基站的列表里有小明父亲的名单==》v-on:parentFunction,然后,短信又由基站传到了老王那边,老王的手机响了,响铃相当于调用了customParentFunction方法,然后,值就传递过来了。
情景二:
但是呢,小明在外打工,有时工作比较忙,忘了给爸爸发短信,所以老王想儿子了,但老王比较保守,又没太上过学,也不会打字,所以写了封新,去了邮局。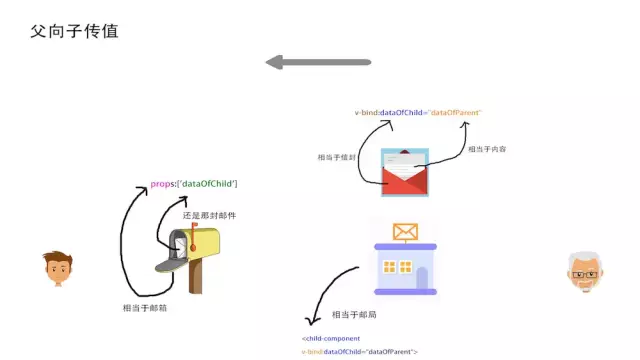
老王用笔在纸上写了好多内容,把纸纸相当于dataOfParent,也就是数据放进了信封信封相当于属性,也就是v-bind:dataOfChild里,然后给了邮局相当于child-component,相当于一个中介,快递员近了派送,小明来到了邮箱相当于props,看到里边有封信相当于父组件的值,拿了出来。
- 兄弟组件传参
兄弟组件之间传递数据 (事件车—-原理也是事件的订阅发布模式)
- 每一个vue的实例都是独立的;相互之间不能直接进行改变数据;
- 给两个不同的组件找一个载体;把共同的方法放在这个载体上;
- 这个载体就是 let eventBus = new Vue; // 创建一个新的vue实例;
- 在这个新的实例上,有 $on: 订阅 $emit: 发布;
- $on的绑定要基于钩子函数,一般放在created或者mounted上
这种方法通过一个空的Vue实例作为中央事件总线(事件中心),用它来触发事件和监听事件,巧妙而轻量地实现了任何组件间的通信,包括父子、兄弟、跨级。
const EventBus = new Vue();EventBus.$on(事件名,data=>{}); // 订阅EventBus.#emit(事件名,数据); // 发布
假设兄弟组件有三个,分别是A、B、C组件,C组件如何获取A或者B组件的数据
<div id="itany"><my-a></my-a><my-b></my-b><my-c></my-c></div><template id="a"><div><h3>A组件:{{name}}</h3><button @click="send">将数据发送给C组件</button></div></template><template id="b"><div><h3>B组件:{{age}}</h3><button @click="send">将数据发送给C组件</button></div></template><template id="c"><div><h3>C组件:{{name}}--{{age}}</h3></div></template><script>const EventBus = new Vue(); // 定义一个空的Vue实例const myA = {template: "#a",data(){return {name: 'zhang'}},methods: {send(){EventBus.$emit("myData-a",this.name)}}}const myB = {template: "#b",data(){return {age: 18}},methods: {send(){EventBus.$emit("myData-b",this.age)}}}const myC = {template: "#c",data(){return {name: '',age: '',}},methods: {},mounted(){EventBus.$on("myData-a",name=>{this.name = name;})EventBus.$on("myData-b",age=>{this.age = age;})}}const vm = new Vue({el: "#itany",data: {},methods: {},components: {myA,myB,myC}})</script>
$on 监听了自定义事件 data-a和data-b,因为有时不确定何时会触发事件,一般会在 mounted 或 created 钩子中来监听。
<div id="app"><tmp1></tmp1><tmp2></tmp2></div><script>const eventBus=new Vue();const app = new Vue({el: '#app',data: {},components: {tmp1: {template: "<h1>组件1{{msg}}</h1>",data(){return {msg:""}},mounted(){ //钩子函数,页面一加载进来的时候就已经绑定好了eventBus.$on('aaa',(data)=>{this.msg=data;})}},tmp2: {template: "<h1 @click='sendData'>组件2{{msg}}</h1>",data(){return {msg: 'hello! My name is tmp2'}},methods:{sendData(){//发布数据eventBus.$emit('aaa',this.msg)}}}}})</>
组件切换
is可绑定的值可以是组件名称,也是是一个组件对象。通过动态切换绑定的值,就可以实现tab页式的效果。
<div id="app"><div class="container"><a href="#" @click="comp='zujian1'">显示组件1</a><a href="#" @click=" comp='zujian2'">显示组件2</a><a href="#" @click=" comp='zujian3'">显示组件3</a></div><!--aaa标签是核心,必须得写,通过is决定显示那个组件--><aaa :is="comp"></aaa></div><script>var app=new Vue({el:'#app',data:{comp:'zujian2',},components:{zujian1:{template:'<h1>大家好~我是组件1</h1>'},zujian2:{template:'<h1>大家好~我是组件2</h1>'},zujian2:{template:'<h1>大家好~我是组件3</h1>'}}})</script>
前端路由
基于瞄点实现的路由模式
在学习vue路由实现之前先看下浏览器对象默认的对象属性location
先来看一段代码
<a href="#red">改变背景色</a><!-- 当然页面中如果有id为red的标签,点击后会立即跳转到该标签所在的位置 --><!-- .../index.html---》.../index.html#red --><script>window.onhashchange = function(event){console.log(event.oldURL, event.newURL);let hash = location.hash.slice(1); // reddocument.body.style.color = hash;}</script>
Location对象的属性
| 属性 | 描述 |
|---|---|
| hash | 设置或返回从(#) 开始的 URL(锚点) |
| host | 设置或返回主机名和当前 URL 的端口号 |
| hostname | 设置或返回当前 URL 的主机名 |
| protocol | 设置或返回当前 URL 的协议 |
| href | 设置或返回完整的 URL |
| pathname | 设置或返回当前 URL 的路径部分 |
| port | 设置或返回当前 URL 的端口号 |
| search | 设置或返回从问号 (?) 开始的 URL |
Location对象的方法
| 方法 | 描述 |
|---|---|
| assign() | 加载新的文档 |
| reload() | 重新加载当前文档 |
| replace() | 用新的文档替换当前文档 |
| hashchange() | 监听hashchange变化 |
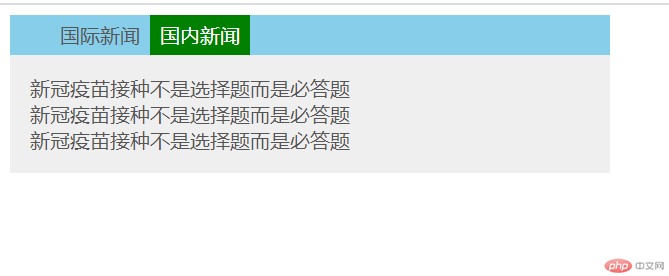
用哈希瞄点原生实现选项卡功能
<style>a {text-decoration: none;color: #555;}li {list-style: none;}ul {margin: 0;padding: 1em;}.container {width: 30em;display: flex;flex-flow: column nowrap;}nav {height: 2em;line-height: 2em;padding: 0 2em;background-color: skyblue;display: flex;}nav a {padding: 0 0.5em;}nav a:hover {background-color: green;color: white;}.route-view {background-color: #efefef;}.route-view ul li {line-height: 1.5em;}.route-view ul li a:hover {color: coral;}</style><!-- 选项卡 --><div class="container"><!-- 导航 --><nav><a href="#/list1">国际新闻</a><a href="#/list2">国内新闻</a></nav><!-- 导航对应的列表内容 --><div class="route-view"></div></div><script>let list1 = `<ul><li><a href="">福岛核废水与核电厂正常废水有区别</a></li><li><a href="">福岛核废水与核电厂正常废水有区别</a></li><li><a href="">福岛核废水与核电厂正常废水有区别</a></li></ul>`;let list2 = `<ul><li><a href="">新冠疫苗接种不是选择题而是必答题</a></li><li><a href="">新冠疫苗接种不是选择题而是必答题</a></li><li><a href="">新冠疫苗接种不是选择题而是必答题</a></li></ul>`;const routeView = document.querySelector(".route-view");console.log(routeView);console.log(window.location.href); // 链接地址console.log(window.location.hash); // 哈希瞄点// 监听url中的瞄点的变化window.addEventListener("hashchange", show);// 推荐DOMContentLoaded代替load,因为他只要创建好DOM树就可以触发window.addEventListener("DOMContentLoaded", show);function show() {let hash = location.hash.slice(1);console.log(hash);switch (hash) {case "/list1":routeView.innerHTML = list1;return;case "/list2":routeView.innerHTML = list2;returndefault:routeView.innerHTML = list1;}}</script>
Vue Router路由原理与实现
Vue路由的安装
官网文档地址:https://router.vuejs.org/zh/installation.html
下载 / CDN: https://unpkg.com/vue-router@3.5.1/dist/vue-router.js
在 Vue 后面加载 vue-router,它会自动安装的:
<script src="https://cdn.jsdelivr.net/npm/vue/dist/vue.js"></script><script src="https://unpkg.com/vue-router@3.5.1/dist/vue-router.js"></script>
基于Vue Router来实现选项卡案例
<!-- 选项卡 --><div class="container"><!-- 导航 --><nav><!-- router-link: 就是a标签 --><!-- to 相对应a标签中的href --><router-link to="/list1">国际新闻</router-link><router-link to="/list2">国内新闻</router-link></nav><!-- 导航对应的列表内容 --><router-view class="route-view"></router-view></div><script>let list1 = {template: `<ul><li><a href="">福岛核废水与核电厂正常废水有区别</a></li><li><a href="">福岛核废水与核电厂正常废水有区别</a></li><li><a href="">福岛核废水与核电厂正常废水有区别</a></li></ul>`};let list2 = {template: `<ul><li><a href="">新冠疫苗接种不是选择题而是必答题</a></li><li><a href="">新冠疫苗接种不是选择题而是必答题</a></li><li><a href="">新冠疫苗接种不是选择题而是必答题</a></li></ul>`};// 创建路由对象const router = new VueRouter({// 路由配置routes: [{ path: '/list1',component: list1},{ path: '/list2',component: list2},{ path: '', redirect: '/list1' }],});// 注册路由const vm = new Vue({// el: ".container",data: {},methods: {},router}).$mount(".container");</script>
更多相关文章
- 通过注解的 springboot+mybatis 多数据源配置
- 17.SpringCloud实战项目-SpringCloud整合Alibaba-Nacos组件
- 10. SpringCloud实战项目-微服务划分图
- 11. SpringCloud实战项目-初始化数据库和表
- 16.SpringCloud实战项目-Spring Cloud Alibaba 组件简介
- Windows如何安装mysql数据库!
- 【OCP最新题库解析(052)--题16】Your database instance is in N
- 关于修改密码带特殊符号以及数据泵参数设置的一些小知识(2)
- 【故障处理】DG环境主库丢失归档情况下数据文件的恢复(3)